
When you request a quote for a custom molded pulp package, you may see more than one tooling item: a forming mold, a hot-press mold, perhaps a trimming die, and sometimes a punching die. It is reasonable to ask why one product needs several molds—and why those molds are made from different materials.
The short answer is that each tool has a different job. One shapes wet pulp, another may transfer or press the part under heat, and another removes material after forming. The tool material should match what happens at that particular stage of production. A mold that mainly gives pulp its initial shape does not face the same conditions as a mold that must conduct heat or a die that cuts a hole.
There is no universal tooling set for every molded pulp product. A simple protective insert and a smooth retail tray may follow different production routes, even if their final dimensions are similar. Understanding the role of each tool helps you read a quotation and discuss which steps your design actually needs.
Forming molds: why ABS is often suitable
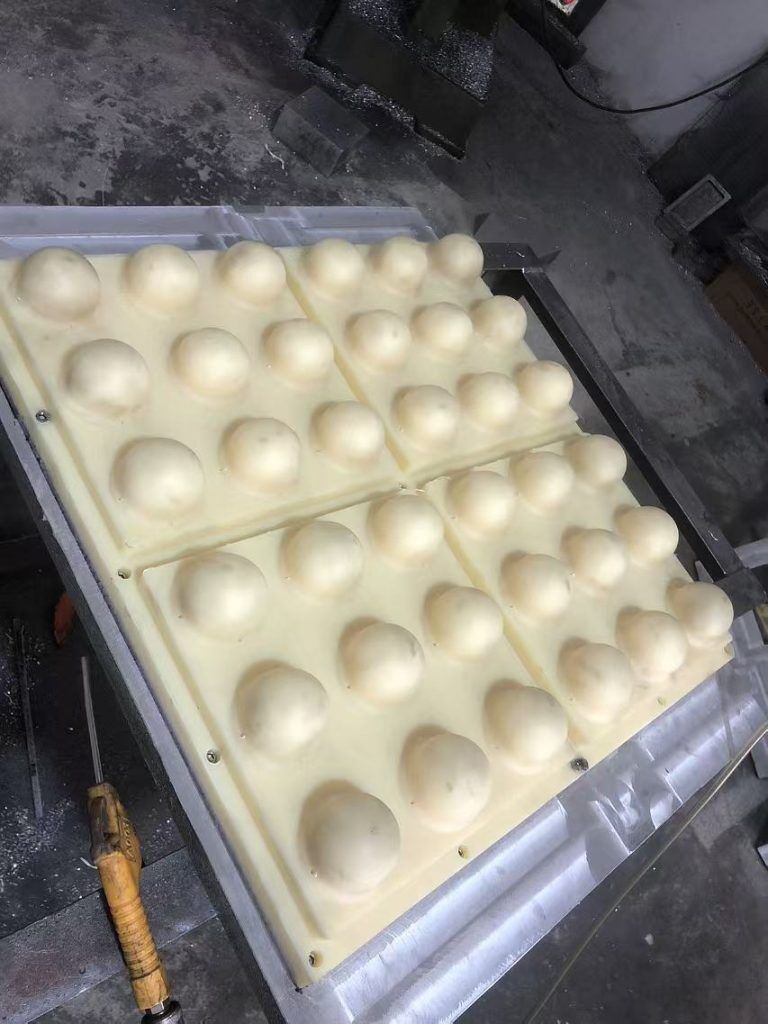
Forming is where a molded pulp product begins to take shape. Pulp fibers suspended in water are drawn onto a shaped mold, creating a wet part that roughly follows the intended design. That wet part must then be removed or transferred for the next stage.
For a conventional forming mold, ABS is a common material in our production setup. Its main role is to define the shape of the wet pulp. It does not have to perform the heat-transfer job of a hot-press mold, so using aluminum for this part of the tooling is not automatically necessary.
This does not mean an ABS forming mold experiences no contact or mechanical load at all. It means the operating demands are different from those of a heated pressing tool. Choosing a material suited to the forming step can keep the tooling practical without paying for a capability that step does not require.
There is an important exception. In some wet-press production setups, the upper forming mold also helps transfer the wet part to the hot-press station. Because that tool participates in the transfer and subsequent process, aluminum may be required. The choice depends on how the line handles the part, rather than on the word “forming” alone.
For that reason, two quotes for apparently similar wet-pressed trays might list different materials for the forming tool. Before comparing the numbers, it is worth checking what each forming mold is expected to do.
Hot-press molds: aluminum for a heated process

A hot-press mold has a different task. It applies heat and pressure to help the pulp part dry and take on its final shape. In this stage, efficient heat transfer matters, so aluminum is a standard choice for our hot-press tooling.
Think of the forming mold as establishing the basic geometry. The hot-press mold then works on the part under heat, helping control its finish and dimensions. This is particularly relevant when a product needs a smoother surface, a more defined appearance, or tighter control than the initial forming step alone can provide.
The fact that aluminum is used here does not mean every molded pulp product needs a hot-press mold. Some dry-pressed protective packaging is supplied without a separate hot-press step when its appearance and performance requirements allow it. For other products, hot pressing is an essential part of the agreed process. The decision should follow the product specification, not a blanket rule applied to all molded pulp.
If you are considering a premium retail pack, tell your supplier what the customer will actually see and touch. If the part is hidden inside a shipping carton, explain what it needs to protect and where dimensional fit matters. Those details make it easier to determine whether hot pressing adds value to your product.
Trimming dies: wood or steel for the required edge

Once a molded pulp part is formed and dried, it may still have excess material around its perimeter. Trimming removes that material and creates the intended edge. This stage uses a cutting die, which is a different type of tool from the mold that shapes the pulp.
For many conventional trimming jobs, a wooden cutting die is a practical choice. The wooden base holds the cutting blade in the required position. It can be suitable when the cutting path and edge requirements are relatively straightforward.
Some designs call for a more demanding trimming solution. If the edge shape is complex or the cutting requirements are higher, a steel die may be considered. The selection depends on the actual contour, the product structure, and the required result. Steel is not automatically needed just because the product is described as “premium,” nor can a wooden die be assumed suitable for every edge.
A common source of confusion is the belief that trimming always means cutting around a flat, accessible outline. A molded pulp part may have curved walls, raised features, or a flange whose proposed cutting line does not sit on one plane. In such cases, the cutting method needs to be reviewed together with the part geometry. A small change to the edge in a drawing may have a large effect on the tooling approach.
This is why it helps to mark the intended final cut line on the drawing. If a particular outer dimension or edge is critical, call that out as well. We can then assess whether the proposed trimming method can achieve it before tooling is made.
Punching dies: when ordinary trimming cannot reach the feature
Trimming and punching both remove material, but they do different jobs. Trimming commonly defines an external edge. Punching may be needed for a hole, slot, or other feature that cannot be completed reliably with the ordinary trimming method proposed for the product.
Punching dies are generally made from steel. They need to cut the required feature at the specified location on the molded part. The design of the feature matters: a hole in a relatively accessible area may present a different challenge from one placed on a curved wall or close to another structural detail.
Suppose a molded pulp tray needs a clean outer perimeter and two openings for an assembly step. The perimeter might be handled by a trimming die, while the openings require a separate punching operation. In another design, the openings might be changed or eliminated, so that extra die would not be needed. The goal is not to add tooling by default; it is to identify the operations needed to make the finished part.
If a quote includes a punching die, ask which feature it creates. If your design is still flexible, there may be room to adjust the feature or its position. Any proposed change should be checked against how the product is used, particularly where a hole is needed for fastening, ventilation, or handling.
Does every molded pulp product need all these tools?
No. The tooling list follows the production route and the final part requirements.
A dry-pressed protective buffer with modest appearance requirements may need forming and an appropriate edge-finishing solution, without a hot-press mold. A wet-pressed retail tray may need forming and hot-press tools, plus trimming if its final edge requires it. A part with special holes may also need punching. These are examples, not fixed packages: even within one product category, the geometry and production setup can change the answer.
It is also possible for a tooling decision to affect the product design. A flange that looks fine on a screen may be difficult to cut along the exact proposed line. A very sharp corner may be less practical in molded pulp than a rounded one. Reviewing these details before finalizing the drawing can prevent an unexpected tooling charge or a design revision after sampling.
When comparing quotations, look beyond the total mold cost. Check which operations are included and what finished result each supplier is quoting. If one proposal includes punching and another does not, the two suppliers may be interpreting the same feature differently. A clear breakdown lets you compare the actual manufacturing plans.
What should you share for an accurate tooling proposal?
You do not need a perfect production drawing before starting a conversation. But the more we understand about the final part, the more specific the tooling recommendation can be. The most useful starting information includes:
- A drawing, 3D file, or physical sample, including the intended final dimensions.
- What the package holds and which surfaces or dimensions are important for fit.
- Your appearance requirements, including whether the part will be visible to consumers.
- The required outer edge, holes, slots, and other features that need cutting.
- Your expected order quantity and annual volume.
If you already have an outer carton or another component the molded pulp part must fit, share that information early too. It can guide the dimensions of the insert and help the team assess the complete packaging arrangement. There is no reason to change an existing carton simply for the sake of using molded pulp if a workable insert can be designed around it.
During the review, we can identify which tools are needed for forming, whether hot pressing is appropriate, and how the final edges and openings will be made. If the design presents a difficult cutting or transfer step, it is better to discuss it while changes are still easy to make.
The material follows the job
ABS, aluminum, wood, and steel appear in molded pulp tooling for different reasons. ABS commonly serves the conventional forming stage. Aluminum is used where the process calls for heat transfer, and it may also be needed for a forming upper mold involved in transferring a wet-pressed part. Wooden cutting dies can handle many conventional trimming tasks, while steel may be used for more demanding cutting and for punching features that ordinary trimming cannot complete.
The useful question is not “Which mold material is best?” It is “What does this tool need to do for this particular product?” Once the production steps are clear, the material choices—and the separate tooling lines in a quote—become much easier to understand.
Planning a custom molded pulp package? Send InNature Pack your drawing or sample, along with the intended finish, edge details, and estimated volume. We can review the production steps, recommend the tools your design needs, and prepare a corresponding tooling quotation.